The following images are of prints made over the course of developing a plate. I experimented with a variety of markings in an attempt to make a tonally rich print.
While I am not entirely happy with the final state of this plate, I did learn a few lessons that I can apply to future plates. It may not be obvious in these online reproductions but I mistakenly over-etched sections where I wanted to attain my lowest dark (around zone 2 for you Zone System photographers). This resulted in a rather ‘hollow’ grey. Although I imagine this could be used to represent reflected light in shadows, it was not what I was after.
For those of you who are not familiar with etching, it is one of 5 itaglio printmaking processes (dry-point, engraving, aquatint and mezzotint being the others). Intaglio is a form of printmaking that uses a recess, an indentation in a surface, to hold ink. When the plate is run through a press, the ink in the recesses comes out onto paper. Etching actually refers to the use of acid to ‘bite’ into the plate.
The plate has to first be prepared before etching. In my case I used a copper plate. First I beveled the edges of the plate with a file so that it does not cut into the paper. Next the plate has to be polished and thoroughly cleaned with alcohol. Now, it is ready to be covered with a ‘ground’, a wax behaving as a barrier between the plate and the acid. When this barrier hardens, markings can be made (often with an etching tool) to reveal the copper below. Wherever the copper is revealed, the acid will etch into the plate and create a recess.
Here are my experiments. Printmaking is indeed limitless, which for me is both daunting and exciting. Further experiments can be made with etching times, types of marks, tools, papers and so much more. I would say that the most important lesson that I learned is that I simply have to keep working.

State 1: This plate was etched twice. The first set of lines were made in the acid after 15 minutes. I washed the plate with water but did not remove the ground. I then added more lines and returned the plate to the acid for 15 more minutes. The initial lines therefore were etched for twice as long as the second.

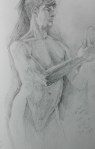
State 2: I simply worked on the print with graphite to have a better sense of where I wanted to take it next.

State 3: This print was pulled after etching an aquatint. After applying Liquid Asphaltum to places that I did not want to be etched, I put the plate in a Rosin Box. Drops of an acid resist settled on my plate and after 8 minutes I took it out of the box, melted the drops over a hot plate and let it cool. I then put the plate in the acid for 20 seconds, washed the acid off quickly and applied more liquid asphaltum. This time, I put the liquid asphaltum over what now looks like the slightly lighter leaves. I let the background be etched for 20 more seconds, creating an even darker tone.

State 4: This plate has a few changes made on it. I removed some of the aquatint with a burnishing tool and steel wool to break up the evenness of the tone and achieve a sense of light. I also etched stippled points to have a greater variety of marks.

State 5: This print is the same as the last, only it was made with dark brown ink instead of black ink. The result is a bit warmer than the previous.


 Of late, I have been thinking a bit about where I have been and about the road ahead. This has led me to archive sketchbooks I kept in 2006 during a 5 month trip around Europe. On a shoestring budget, I traveled with a partner by train, bus and boat. We started in Paris, and in something of a loop worked our way around the western block, up Eastern Europe and then back to Paris through the north.


